Spriting Update (Guide: Pixel Overs)
| « Previous Article | Home | Next Article » |
Welcome once again to the Smog's spriting update! This installment (and hopefully forthcoming installments) will not only include a guide to a particular form of spriting, but also the results of the Smog spriting competitions—certainly making these articles more thorough than you've ever seen before! Hopefully you'll enjoy it.
As a reminder, it is very highly recommended that you read all articles prior to this one—the order of the guides is designed to ease the reader into spriting, so learn the basics first!
Spriting Incognito Competition Results
The first ever Smog spriting competition saw a record-breaking number of entries, despite it not even reaching double figures. Don't forget that this installment will also include a competition, so be sure to enter and possibly get your hard work shown in the Smog!
First Place
Diploman

There are many impressive attributes of this sprite. First, it must be noted that Charizard is a sprite that loses its outline when attempting to remove the background—this means that Diploman has avoided a common mistake of simply leaving the (lack of) outline unfixed. The body has also been flawlessly recolored—even the tail flame has been recolored to match. However, a glaring flaw is that the outline has not been recolored; this is very easy to miss when beginning to sprite, but it makes all the difference. Overall, however, a deserved first place.
Second Place
funerallaughter
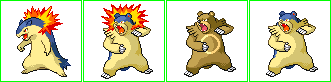
The difference between first and second place was very small, but Diploman only just nudged into the lead because of a few minor errors on funerallaughter's part. First of all, on the left of Ursaring the blue 'fur' of Typhlosion has been scratched on, but it is not very smooth. Ursaring's claws have also been left on, it would be interesting to see what it looked like without. Also consider making Ursaring's 'shoulder pads' Typhlosion's fire—it is this type of creativity which makes the best disguises.
Third Place
Dio Vento

And so we come to third place. While these sprites are almost perfect execution-wise, they lack a key point of disguises—choosing similar Pokemon. This generally makes the colors 'fit' better, in that it is possible to see such colors on such a Pokemon (after all, it's called a disguise!). However, these are still good sprites.
Guide: Pixel-Overs
Pixel-overs are the closest spriting will ever get to 'true art'. In its simplest description, a pixel-over is effectively spriting over an existing piece of artwork. This is often done to add the bright, cartoony feel of sprite colors, or just for making large scale sprites (as seen in Project Amethyst in Smeargle's Studio). While possibly not as complicated as other forms of spriting, pixel-overing is much more time consuming—it is not unlikely that larger pieces will take hours. However, if a pixel-over is done well, it can be breathtaking.
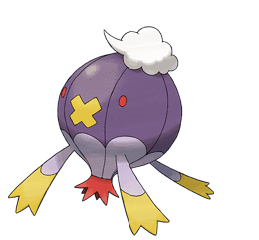
Of course, the first step is choosing exactly what to pixel-over. Really, it can be anything as long as the drawing is anatomically correct—though don't choose anything too big or you'll be on for a long time. For this example, I've chosen the Sugimori art of Drifblim—what's not to like about a ghostly balloon?
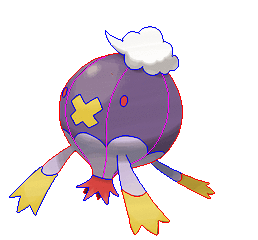
Usually, as most art files are not .PNG format, you will not be able to simply erase the background, as is the usual case with smaller sprites. It is recommended that you print screen the artwork into paint and then add a green (or any other color for transparency) background. The astute amongst you will notice that this leaves white and grey pixels around the outline of the picture—this will be dealt with later.
The first step is to outline all features of the sprite. It is generally helpful to use different colors to avoid lines clashing and making the outline somewhat distorted. Keeping a smooth and accurate outline here is of the utmost important—no matter how good the shading is, if the outline is flawed then the entire sprite will look shoddy. Though you've probably read these few sentences in a few seconds, this stage can take up to twenty minutes, so grab some snacks!

While it is important to have as accurate an outline as possible from the very beginning, I often find myself altering the outline slightly many times throughout the pixel-overing process, so don't worry too much. Now that there is a solid outline, all of the anti-aliasing around the outline should be removed. Unfortunately there is no way to do this without the eraser or pencil tool, so it needs to be done by hand. You should end up with something like this.

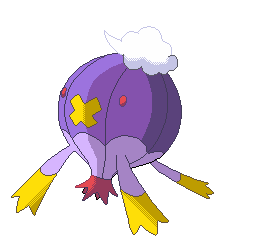
Now that the anti-aliasing has been removed, it is easier to spot more jagged parts of the outline. The top left edge of Drifblim's balloon body seems quite uneven; let's take a closer look.

This is relatively easy to fix, but difficult to turn into a perfect curve. Just try to get as smooth an edge as possible by lowering protruding sections. Something like this is sufficient:
Now comes the most laborious part of the entire process—removing everything except the outline we've just drawn on. For the same reasons as to why we couldn't change the background, the fill tool will not work here—unfortunately the eraser tool must be used in MS Paint to remove the 'filling'. This is easily the most time-consuming part of the process, but bear with it!

With only parts that you yourself have sprited left, this is really beginning to look like an actual sprite (albeit a rather large one!). From here things start to go a lot faster, so congratulate yourself on having done the majority of the work. The next stage is adding the basic colors—these should be obtained from the most recent sprite, in this case the Platinum sprite. In spriting it is generally assumed that light comes from the top left, so take this into account when filling in the basic colors.

![]()
Now to add the basic shading—this should usually just be an extension of the basic shading in places that you feel appropriate (i.e. areas in shadow).

We're almost there! Now it's simply a case of coloring the outlines and adding the final touches. It is in this stage that you will most likely be creating square blocks of pixels where outlines of the same color overlap—take care to fix this if it occurs.

Now it's simply a case of adding the final touches, such as dithering. When applying dithering, it is essential to remember that in pixel-overs it is generally used to create texture. Since Drifblim's body is an inflated, somewhat shiny balloon, dithering should not be used extensively. Really, you shouldn't apply much dithering, as I have in this situation.
And after many cups of tea, snacks, and hours of outlining and shading there we have it—a pixel-over of everyone's favourite ghostly balloon, Drifblim!

As usual, now begins a pixel-overing competition to see who has learned the most from this issue. Please send your pixel-overs to myself, Alchemator, and if they're good enough they might even be featured in the next issue!
| « Previous Article | Home | Next Article » |